Scalloped Potatoes Part 1

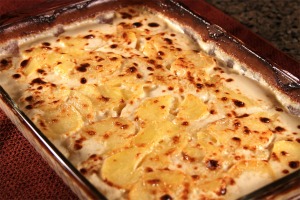
Scalloped Potatoes

Classic Scalloped Potatoes

Cooking with a potatoes for many of us is a love-hate relationship. The love comes from the varieties, flavors and the many ways you can cook with them. The hate comes from the peeling process. Lets face it, how many hands go up in your household when someone says “Who wants to peel the potatoes?” Images of cooks peeling away at volumes of potatoes to feed an army quickly comes to my mind.

Potato Peeling KP Duty

Potato Peeling KP Duty

Then there are scalloped potatoes. These potatoes need to be peeled and then cut into 1/8 inch slices. I don’t know about you, but I am not very good at doing that even with a good knife. Before we dive into some recipes for scalloped potatoes, there are two kitchen tools that will make this task easier. For peeling, it is a Apple and Potato Peeler. This links to the version that we own. This works reasonably well except on very large potatoes or those that have an irregular shape. Next on our potato equipment addition was a Mandoline Slicer. This slicer was highly recommended by Americas Test Kitchen. I can’t recall when I got this wonderful kitchen device but if you are a potato lover, this should be on your list of must haves. Slicing uniform potatoes is simple and easy. Scalloped or french fries this can really make short order of the task.

The first recipe comes from our family friend Glenys Elliott. A recipe that is richer in the dairy ingredients than some recipes but that gives it a nice creamy body. Stayed tuned for our other scalloped potato recipes.

Glenys Elliott’s Scalloped Potatoes

Recipe

    Printer Friendly

1 1/2 cups finely sliced onions
1 1/2 lbs potatoes, peeled and finely sliced
4 Tbs flour
1 1/2 tsp salt
1/2 tsp black pepper
1 1/2 cups milk
1 1/2 cups whipping cream 35% BF

Preheat oven to 350.

Select a baking dish with at least 1-2″ to spare when potatoes and onions are in it – cream bubbles up and may spill over. You can also put a tray underneath as you would with a pie to catch the excess.

Mix flour, salt and pepper in a small bowl.

Layer the potatoes and the onions in dish, sprinkling the flour mixture between the mixture. Cover dish tightly with foil.

Bake in oven for 1 hour, remove foil and bake for 1 hour more. If you double the recipe you may have to adjust the cooking time. Allow to potatoes to rest for 10-15 minutes before serving.

Slow Cooker Ribs

Slow Cooker Ribs

Courtesy of Chowtown.wordpress.com

Pork ribs remind us of warm summer days and firing up the barbecue. Right now our five burner bbq grill is sitting on the patio with over two feet of snow around it. So why are we talking about ribs then. The month of January was the clean out the freezer project and a rack of ribs was sitting there waiting to be consumed. A plan had to be crafted when a few weeks ago I found a recipe while searching tags on wordpress.com that brought me to the blog Chowtown. There right before my eyes was a recipe for ribs made in a slow cooker.

I had never thought of using a slow cooker before; what an interesting concept. Then I started to think about how I slowly cook a chunk of pork shoulder in the oven. The slow cooker is just a smaller oven that is good at keeping moisture in so the idea seemed to make a lot of sense. Sure enough the concept worked and will now challenge me to create some new rib concepts in a slow cooker.

The recipe can be found here thanks to the efforts of RuneRider. The only thing I changed in the recipe was adding some more liquid for covering the ribs and increasing the cooking time. Time is probably dependent on the type of slow cooker you have and the style of ribs.

The ribs were very tender and flavorful with very little preparation. They truly are the fall of the bone type when they are done. Enjoy them with a nice side of cole slaw and some beans.

Sour Cream-Fudge Layer Cake

Happy Valentines Day!

Sour Cream Fudge Layer Cake

My valentine made this cake for dessert tonight. I know Sour Cream Fudge cake does not sound that appealing but really this is an amazingly good cake. The cake is light and moist with a rich heavy icing that will make any chocoholic happy. The recipe was dug out of the Baking Illustrated cookbook. A book we highly recommend.

Recipe

Sour Cream Fudge Layer Cake
1 cup natural cocoa powder
2 tsp instant espresso powder , or instant coffee
1 cup boiling water
2 tsp vanilla extract
1/2 cup sour cream
16 Tbs unsalted butter (2 sticks), softened
1 3/4 cups granulated sugar
2 large eggs , at room temperature
1 1/4 cups unbleached all-purpose flour
3/4 tsp baking soda
1/2 tsp table salt

Chocolate Butter Icing
9 oz bittersweet chocolate , or semisweet
8 Tbs unsalted butter (1 stick)
1/3 cup light corn syrup

1. For the Cake: Pre-heat the oven to 350 degrees. Grease two 9-by-1 1/2-inch round baking pans with butter or shortening. Line pan bottoms with waxed or parchment paper; grease the paper as well. Dust pans with flour removing the excess.

2. Mix the cocoa and instant coffee in a small bowl. Next add boiling water and mix until smooth. Cool to room temperature.

3. Beat the butter in bowl of an electric stand mixer set at medium-high speed until smooth and shiny, about 30 seconds. Gradually sprinkle in sugar beating the mixture until fluffy and almost white (3 to 5 minutes). Add eggs one at a time, beating 1 full minute after each addition.

4. Stir in vanilla and sour cream into cocoa mixture. Whisk flour, baking soda and salt in a medium bowl. With stand mixer on lowest speed, add about 1/3 of dry ingredients to batter, followed immediately by about 1/3 of cocoa mixture; mix until ingredients are almost incorporated into batter. Repeat process twice. When the batter appears blended, stop the mixer and scrape the sides of the bowl with rubber spatula. Continue again at low-speed; beat until batter looks satiny, about 15 seconds longer.

5. Divide batter evenly between pans using a scale (weigh each pan first). Smooth the batter to pan sides with an even top. Bake the cakes until they feel firm in center when lightly pressed and skewer comes out clean , 23 to 30 minutes. Transfer pans to wire racks; cooling for 20 minutes. Run knife around perimeter of each pan inverting the cakes on to racks, and peel off paper liners. Flip the cakes on to additional racks and cool completely before frosting.

6. For the Icing: Melt the chocolate and butter in a medium bowl set over pan of almost-simmering water or any double boiler setup. Stir in the corn syrup. Set bowl of chocolate mixture over a larger bowl of ice water, stirring occasionally, until the frosting is just thick enough to spread. Apply icing on to first cake layer and spread with a long metal spatula, top with second cake layer, top second layer with icing, spread and then ice sides.

Servings: 12

Basic White Bread

Basic White Bread

Baking bread is an easy way to put smiles on faces. The smell and texture of this basic white bread is wonderful. Folks at our house were getting cabin fever after another 12 inches of snow put us to an all time record for snow in one winter. Smiles were on the decline so it was time to bake some bread.

The bread recipe is from Beautiful Breads and Fabulous Fillings: The Best Sandwiches in America. This is the basic foundation bread recipe for a collection of other flavored breads. I have changed the measures and yields of the recipe from the book because most people do not have stand mixers that hold 16 cups of flour! I am not sure where the editor for this book was during the proofing. Maybe the editor does not cook.

Get the butter out and spread some on this wonderful bread; you will not regret it.

Recipe

1 Tbs yeast
2 cups warm milk
2 cups half-and-half
1/4 cup butter melted (1/2 stick)
1/4 cup powdered sugar
8 cups all-purpose flour or bread flour
1 1/2 Tbs salt
1 egg
2 Tbs water
2 Tbs butter for coating pans
1 Tbs Honey (optional)

1. In a large bowl, dissolve the yeast in the milk and half and half (liquid needs to be warm). Let stand at least 5 minutes until the yeast is foamy. Add butter and mix with a whisk. Add powdered sugar and mix well to break up the clumps.

2. In a large bowl or stand mixer bowl combine flour and salt. If using a stand mixer attach the dough hook. Slowly add the liquid mixture to the flour mixture and knead well. If using a stand mixer, knead for 3-4 minutes. If by hand, 4-7 minutes.

3. Place the kneaded dough in a generously buttered bowl, cover with a towel and let rise in a warm dry place for 60 minutes.

4. Punch the dough down with your fist and divide into 2 equal portions.

5. Generously butter two 9 inch loaf pans. Roll the dough out into a 9 by 11 rectangle and then tightly roll the dough into a loaf, folding in the edges as you roll. A tight roll will ensure a good crumb and minimize air pockets. Form as a loaf and put them in the pans. Let rise another 45 minutes. (At this stage you can freeze one of the portions for future use.)

6. Preheat oven to 400 degrees.

7. Beat the eggs and water together to make an egg wash. Brush over the dough. Alternatively, you can choose your own topping. Bake for 55-60 minutes.

8. Carefully remove loaf from the pan and tap bottom. If sound is hollow it is done. Let loaf cool for 30 minutes in pan on wire racks. You can optionally brush honey on to the top at this point. Cool another 30 minutes before slicing.

Basic White Bread Loaf

Tomato Tortilla Soup

My first taste of tortilla soup was in Mexico several years ago. I have never forgotten the flavors and find myself constantly trying the various styles of these soups at restaurants. This soup is a warm and hearty soup that will fill you up on a cold winter night. It is very rich in color and the jalapeño pepper provides just enough heat so that it does not overpower the dish. The best part of cooking this recipe is the smell of the cumin mixed with the vegetables. It makes me fall in love with the spice every time.

A bowl of this with half a sandwich is a very satisfying meal. It can also be served as a dip with flour tortillas. The soup freezes well but it never lasts long in our house. Enjoy!

Tortilla Soup - Tomato Base

Tortilla Soup

Recipe

2 ears fresh corn, husks removed
5 garlic clove, peeled and smashed
1 small onion (about 3 ounces), peeled, trimmed, and quartered
1 jalapeño pepper, trimmed and seeded
2 Tbsp corn oil
2 corn tortillas, cut into 1-inch squares
2 large ripe tomatoes (1 pound), peeled, seeded, and coarsely chopped
2 Tbsp tomato paste
3 tsp ground cumin
2 quarts chicken stock
Kosher salt and freshly ground black pepper
Garnish:
5 corn tortillas
1 large chicken breast, cooked, boned, and skinned
1/2 cup Cheddar cheese grated
1/4 cup cilantro leaves (optional)
1/2 cup sour cream, (optional)

1. Using a large knife, carefully scrape the kernels off the corn cobs and set aside, reserving the cobs.

2. Using a food processor fitted with the steel blade, or a large knife, coarsely chop the garlic, onion, jalapeño pepper, and corn kernels. Reserve.

3. In a large soup pot, heat the oil. Add the squares of tortillas and cook over low heat until they are slightly crisp. Stir in the chopped vegetables and simmer just until the vegetables are coated with the oil. Do not brown.

4. Add the tomatoes, the tomato paste, and 2 teaspoons of the cumin and continue to simmer for about 10 minutes to maximize the flavor. Slowly pour in the stock, add the corn cobs, and cook over low heat until the soup is reduced by one-third.

5. Discard the corn cobs and purée the soup, in small batches, in a blender or food processor until smooth (do not fill the blender more than 1/3 full). At this point, the soup can be passed through the fine strainer, if desired. Return to a clean pot and season with salt, pepper, and additional cumin to taste.

6. Prepare the garnish: Preheat the oven or toaster oven to 350 degrees F. Cut the tortillas into thin strips and arrange on a baking tray. Bake until the strips are crisp, 10 to 15 minutes. Cut the chicken into thin strips or shred it.

7. To serve, add the chicken to the soup and reheat over low heat. Ladle the soup into 6 to 8 warm soup bowls and garnish with the baked tortilla strips, Cheddar cheese, sour cream and chopped cilantro. Serve immediately.

Shortcuts and Notes:

Use frozen corn instead of cobs when unavailable or to shorten the effort. Approximately 1 1/4 cups equals 2 cobs. Use one can of diced tomatoes instead of the fresh when not in season.

CAUTION: The blender step is dangerous unless the soup is sufficiently cooled. Alternatively use a hand blender if you have one and then strain. You can also skip the straining effort if you don’t care if it is a consistent texture throughout especially if using a blender.

Servings: 8

Source: Adapted from a Wolfgang Puck recipe

Gourmet Macaroni and Cheese

Gourmet Macaroni and Cheese

Gourmet Macaroni and Cheese

Yesterday we were whacked by a huge snow storm here in the Washington DC area. The final totals tallied in at 25 inches of snow which is a lot regardless of where you live. Needless to say some comfort food was in order. The recent issue of Fine Cooking had two macaroni and cheese recipes with a beautiful picture of one of them on the front of the magazine. The picture had taunted us for a week so we preplanned the pantry with the ingredients waiting for the right time to cook it up.

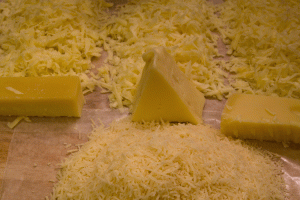
Before we get started on the recipe, I have to say the word “Gourmet” translates into the flavors and the cost of this recipe. The Emmentaler cheese at our local grocer goes for 19.99/lb. Multiply that by four pricey cheeses and the cost for this macaroni and cheese would allow it be served at a five star restaurant. These are also four cheeses that are not found in a bag and needed to be grated. That lead to a response from my cooking partner with cheese in hand and box grater in the other; “Don’t we have something that will make this easier.” If you can stomach the price of this entree and a fair bit of effort keep reading, otherwise stay tuned and I will share our reasonably priced recipe in the near future. Also, suggestions on other grating methods are welcome.

Four Cheeses

Four Cheeses


Our changes to the recipe were only a few. The original recipe called for pulled pork to be mixed in with the macaroni and cheese. We had slow cooked the pork the day before and made the recipe with the pulled pork in it. In retrospect, we did not enjoy the texture of the meal with the pork. It also did not add anything to the flavor. Of course the BBQ pork sandwiches the night before were delicious. We also made fresh bread crumbs, added cayenne pepper and used ground sage instead of sage leaves. An adjustment to the Parmigiano-Reggiano quantities was required as the published recipe had an error. Finally, we changed the pasta type from radiatore to elbows. I had never heard of it before but thanks to Google I now know another pasta type to put on the need-to-try list.

The results were an amazing bouquet of cheese flavors. It was like fondue and pasta all mixed together. The white wine (we used Sauvignon blanc) really came out in the flavor and I may try adding that to my other recipes. The cheeses blended well together with a crunch of Parmesan on the top followed by a smooth nutty and sweet flavor of the Gruyere and piquant nature of the Emmentaler. So have some guests over and tell them the main entree is macaroni and cheese. It will be a taste treat they will not forget.

Recipe

12 oz dried elbows or ridged pasta, preferably radiatore
Kosher salt
4 Tbs (2 oz. ) unsalted butter
2 small yellow onions, chopped (1-1/2 cups)
1-1/8 oz (1/4 cup) all-purpose flour
3-1/2 cups whole milk
1-1/2 cups dry white wine
1 tsp ground sage
1/2 tsp cayenne pepper
Freshly ground black pepper
4 oz grated Gruyère (1-1/2 cups)
4 oz grated Emmentaler (11/2 cups)
4 oz grated fontina (1-1/2 cups)
2/3 cup fresh bread crumbs (about 4 quality white slices)
5 oz finely grated Parmigiano-Reggiano (1-1/4 cups)
2 Tbs extra-virgin olive oil
2 Tbs thinly sliced fresh chives

1. Cook the pasta in a large pot of well-salted water according to package directions until just barely al dente. Drain and set aside.

2. Preheat the oven temperature to 350°F. Melt the butter in a large 8-quart saucepan over medium heat. Add the onions, reduce the heat to low, and cook, stirring frequently, until golden and very soft, about 20 minutes.

3. Place slices of bread in toaster oven at 300°F to dry out (approx 10 minutes. Remove crusts and cut into 1 inch squares. Place squares into a food processor and pulse until you have a coarse blend of bread crumbs. Set aside.

4. Whisk in the flour and cook for 30 seconds. Whisk in the milk in a slow, steady stream. Raise the heat to medium high and whisk constantly until the mixture begins to thicken and bubble, 3 to 5 minutes.

5. Whisk in the white wine, sage, and a 1/2 tsp. each salt and pepper. Bring the mixture to a low simmer, whisking constantly.

6. Reduce the heat to low and use a wooden spoon to stir in the Gruyère, Emmentaler, and fontina. Stir in the reserved pork and pasta until well coated. Pour the mixture into a 12-inch oven safe skillet.

7. In a small bowl, mix the bread crumbs, Parmigiano, and olive oil. Sprinkle evenly over the mixture in the skillet.

8. Bake until the topping is browned and the cheese sauce is bubbling through the topping and around the edges of the skillet, 40 to 45 minutes. (If the topping begins to brown too deeply, tent loosely with foil.) Let the macaroni and cheese rest for at least 15 minutes. Sprinkle with the chives and serve.

Servings: 8

Note: Swiss cheese can be a cheap alternative to the Emmentaler

Source: Adapted from Fine Cooking Feb/Mar 2010

Chicken Tortilla Casserole

This recipe originally came from Elaine, but I have stolen it and made it my own.  I asked her a couple months ago for an easy recipe for a pot luck dinner I was attending.  She pulled this one out, saying she hadn’t had it in 20 years, but she remembered it being a hit.  So I tried it, brought it to my friends apartment and…. it was a HIT!  I came home with an empty dish that night.

I’ve made it a couple more times for my roommate and whoever can come over on a given night.  It has become one of my favorite things to make and truly is a comfort food.  Which is especially nice with this weather we have been having in DC.  The directions are very easy, but like any casserole it takes some time to make, so planning is necessary.  Making it the night before seems to be the best bet.  I made this on Monday night and heated it up on Tuesday when I got home from work.  Since its so easy to reheat, its perfect for someone like myself who doesn’t have a family to feed because I can take my leftovers to work.

Ingredients:

  • 4 baked chicken breasts, shredded
  • 1 lb of shredded cheddar cheese
  • 1 can of cream of mushroom soup
  • 1 can of cream of chicken soup
  • 1 onion, chopped
  • 3/4 cup milk
  • 4 flour tortillas, torn into strips
  • 1 cup of chile salsa

Directions:

  1. Cook chicken and tear into shreds
  2. Preheat oven to 350 degrees
  3. Combine soup, milk, salsa, and the onion in a bowl
  4. In a greased casserole dish, layer 1/2 of your strips of tortilla, 1/2 of the chicken, 1/2 of the cheese and 1/2 of soup mix.  Then repeat with what is left.
  5. Cook in the oven for 45 minutes.

Batata Charp – Potato Cakes with Meat Filling

As promised earlier this month we tried our first recipe from the Middle East Cookbook – Batata Charp. We had prepared our Baharat spices and since there was no required ingredient for lambs brains we were good to go. To be honest, it also looked like one of the simpler recipes from this book. Continue reading

Breaded Ranch Chicken: Easy and Delicious

This is my first entry, so bear with me.

I’m new to cooking so you won’t find any fancy schmancy recipes from me, but you will find some that will probably be enjoyed by children.  I have a pretty simple palette, to say the least.

This chicken is so delicious and easy to make.  My roommate and I have been making it for a couple of years now and decided to break it out again on this snowy day.  With just a few ingredients, a side dish (potatoes, stuffing, rice), and some veggies, we made a great meal that was a nice change from the quick frozen meals that we make far too often.

Ingredients:

-Chicken Tenderloins
-Ranch Dressing
-Italian Bread Crumbs

Directions:

-Pre-heat oven to 375 degrees.

-Pour bread crumbs and ranch dressing in two separate bowls.

-Clean chicken and dip in the ranch dressing.

-Then dip the chicken into the italian bread crumbs.

-Lay the chicken in a greased glass (pyrex) casserole dish.

-Place in oven for 20 min or until chicken is fully cooked.

-ENJOY!

Oatmeal Cookies

For years oatmeal cookies were an inexpensive snack for children coming home from  school; but today they seem to have been replaced by the Chocolate Chip cookies.  The oatmeal cookie came in many forms.  Mothers added dry fruits such as raisins, apricots  or what ever was in the house including nuts.  Today they  seem to be full of spices and raisins are the preferred fruit.  You will see on the  website, a recipe for Mary’s Wafers. They are a very crisp cookie which tastes like oatmeal.  Try it as a single serving or you can take two and put various fillings between them as they were served to me. In past years it was often a date filling, but simple fillings like jam work well. Here is the recipe:

Mary’s Wafers (Oatmeal Cookies)